 Pin It
 The scent of freshly baked cake wafted through my kitchen last June as mortarboards collected on counters and invitations scattered the table. My neighbor's twins were about to graduate, and the idea to craft cake pops in shimmering school colors felt like the ultimate festive salute. I remember the light laughter and the curious gazes as we dipped and decorated late into the evening, each pop becoming a tiny badge of celebration. Mixing crumbs with frosting was oddly satisfying—almost therapeutic. I never imagined cake would transform into cheerful, portable treats this way until a graduation party made it all click.
I remember handing out cake pops at the school gym, feeling a little nervous they'd topple or smudge—until excited graduates began counting their favorite colors and snapping photos. The whole room buzzed as the pops vanished faster than I'd expected. Watching shy kids come out of their shell for treats made the effort worthwhile. One teacher held up a pop and declared it 'too pretty to eat' right before taking a big bite. That moment still makes me grin whenever I plan party snacks.
Ingredients
- Cake mix or homemade cake: Choose your favorite vanilla or chocolate base—the key is letting it cool completely for easy crumbling.
- Cream cheese or buttercream frosting: Just enough to bind crumbs, not so much to make it sticky—start slow and use your hands.
- Candy melts in school colors: These create bright coatings; add a little shortening if the chocolate gets stubbornly thick.
- Lollipop sticks: Essential for perfect pops; I always dip the end in chocolate first to help the cake hold steady.
- Sprinkles, edible glitter, colored sugar: Don't skip these—they're your finishing touch for real party magic.
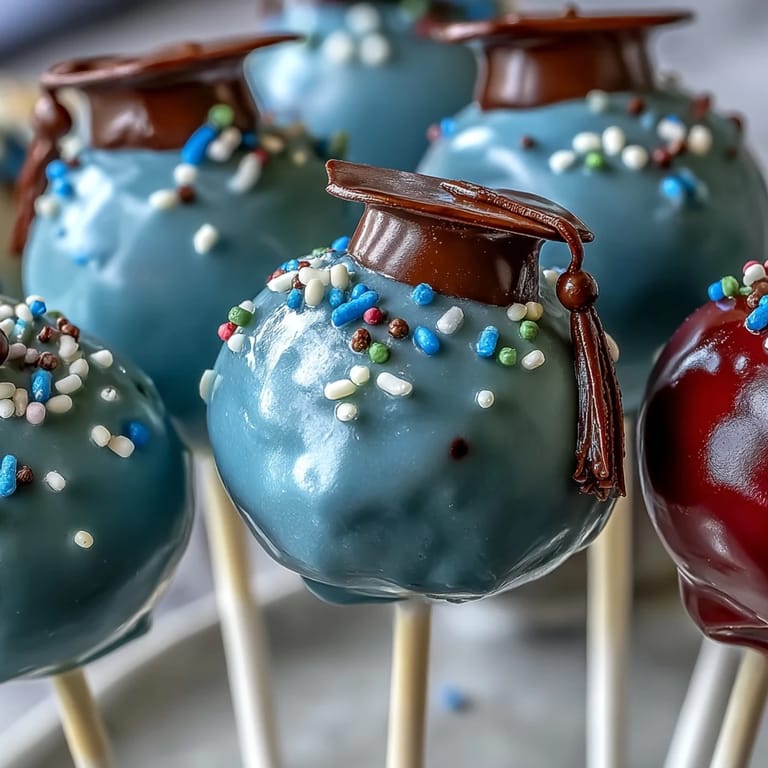
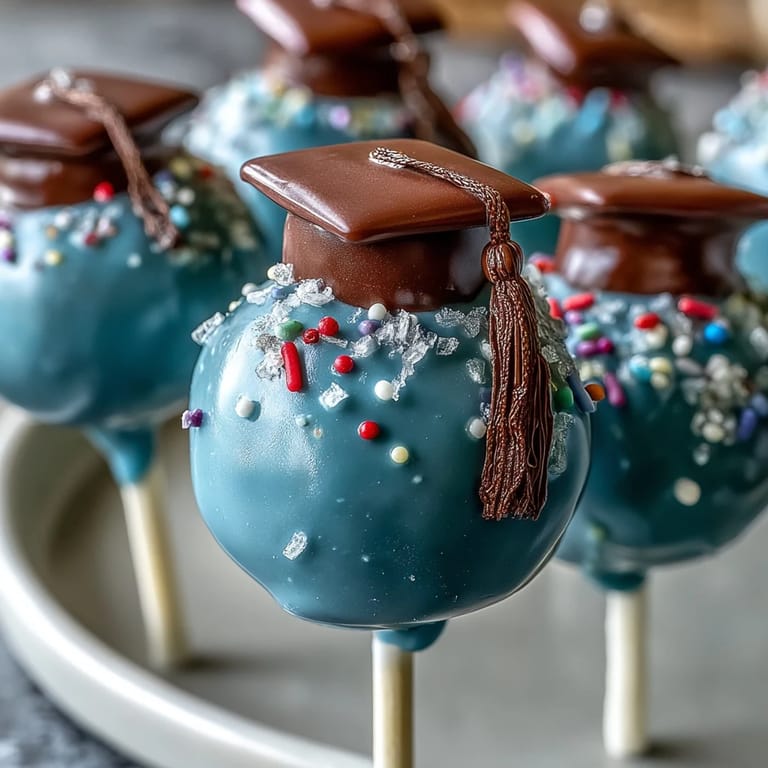
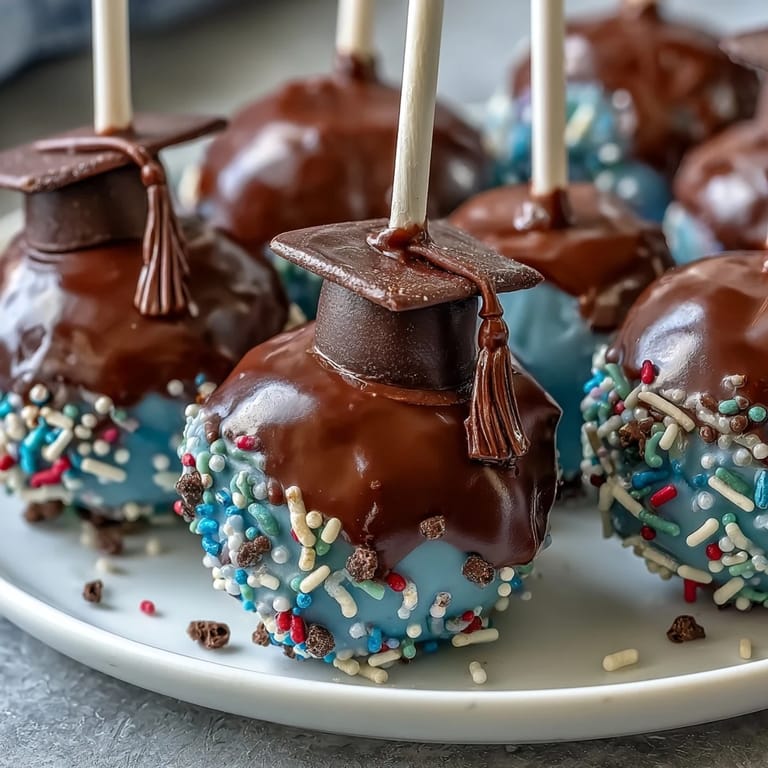
- Mini chocolate chips and fondant: Use for graduation cap accents; stick with matching colors for a polished look.
Tired of Takeout? 🥡
Get 10 meals you can make faster than delivery arrives. Seriously.
One email. No spam. Unsubscribe anytime.
Instructions
- Baking the Cake:
- Let the scent fill the kitchen while you bake as directed. Cooling completely is critical.
- Crumbing & Mixing:
- Use your hands to crumble cake until it's as soft as sand, then start stirring in frosting gently—if it feels like dough, stop.
- Shaping the Pops:
- Scoop out portions with a tablespoon and roll between your palms until smooth; lay them out in uniform rows.
- Chilling:
- Cover and chill until firm—cold pops are much easier to dip and decorate without disaster.
- Melting & Thinning Chocolate:
- Microwave candy melts until silky; add shortening if the mix won't drip smoothly from the spoon.
- Stick Insertion:
- Dip each stick in chocolate, then gently insert halfway into each chilled pop—watch the chocolate seal as you push.
- Dipping & Tapping:
- Immerse pops in melted chocolate, turning and tapping to lose excess—don't rush this or you'll get drips.
- Decorating:
- Add sprinkles and colored sugar quickly while the coating is wet; for graduation caps, press fondant squares and chocolate chips on top using a dab of fresh melt.
- Setting:
- Stand each pop upright in styrofoam and let the coating firm up before sharing or packing; admire your lineup.
 Pin It
 The first time my siblings gathered around with bowls of sprinkles, the kitchen burst into laughter as a cake pop toppled onto the floor—all three dove to rescue it, calling it a 'fallen graduate'. Somewhere between the scattered glitter and school colors, I realized these treats were more than dessert—they celebrated every unique personality at the party.
Decorating Like a Pro
If you're prepping for a crowd, lay out decorations in little bowls so everyone can invent their own pop design—it's half kitchen, half art studio. Fondant squares give a crisp graduation look, but edible markers add fun messages and doodles. Try mixing glitter and colored sugar for pops that shine in photos. Kids love making cap tassels with mini chocolate chips and dots of melted gold or red candy melts, so keep extras handy.
How to Store Cake Pops
Once hardened, cake pops keep nicely in airtight containers; I layer them between parchment to prevent sticking. For gifts or party tables, wrap each in cellophane and tie with school-themed ribbons. At room temperature, they're best within three days—if you refrigerate, let them come to room temp before serving to avoid cracks.
Last-Minute Party Tricks
If you're short on time, freeze the cake balls so they're ready for coating whenever you get a minute. Keep extra lollipop sticks on hand for unexpected guests. Color-coordinated trays make your pops pop visually.
- Mark the serving date on the container so you track freshness.
- For large batches, enlist an assistant to speed things up.
- Always taste one before sharing—quality control is delicious.
 Pin It
 May your graduation cake pops bring smiles and sparkle to every celebration—each one is a tiny trophy for all the hard work. If you have extras the next day, they're even better with morning coffee.
Recipe Questions & Answers
- → How do I achieve vibrant school colors for coating?
Use colored candy melts or add food coloring to white chocolate. Choose hues that match school colors for a custom look.
- → Can I make the cake pops ahead of time?
Yes, prepare and decorate them in advance. Store in an airtight container at room temperature for up to 3 days or refrigerate for a week.
- → How can I decorate pops with graduation caps?
Press a fondant square on the pop and attach a mini chocolate chip for the tassel. Use melted chocolate for adhesion.
- → Are there options for a gluten-free version?
Substitute gluten-free cake mix and double-check all ingredients for allergens and gluten content before preparing.
- → Can I personalize cake pops with messages?
Edible markers work well for adding graduation years or names on pops after the coating has set solid.